This article is similar to the Elm Architecture Tutorial so if you fancy a more official explanation you should check that out too.
One of things that has really impressed me in my research of Elm has been the simplicity of the architecture of an application. An Elm app is essentially just a reactive stream of actions that transition the model into various states and in turn these state changes cause the view to redraw. You don't mutate anything you just create a new state and the entire application redraws itself. Oh and it's fast too. This is thanks to the virtual DOM approach that has risen to fame through the likes of Elm and React.
Essentially Elm allows you to treat the UI as an Immediate Mode UI.
Deconstruction
What I want to do is demonstrate this simplicity by creating a very simple application firstly using the start-app package and then without using the start-app package. By using the start-app package initially we can see how an Elm app hangs together at a high level then, by removing the use of the package, we can dive a bit deeper into how our application is made reactive with some really simple functional patterns.
Using start-app
The start-app package abstracts away most of the boilerplate required to wire up a typical Elm application. It is designed to help people new to Elm get their first application up and running without to much upfront cognitive load. You just supply the StartApp.start a type containing
- Your
modelthat is used to store state - Your
viewthat provides a visual representation of the current state, and, - Your
updatemethod that, through action signals generated from inside or outside your application, transitions your model from one state to another
If you want to follow along you need to have Elm installed. Have a look at the official site for instructions and various editor plugins for Elm.
So lets create our first application.
> mkdir elm-demo-start-app && cd elm-demo-start-app

> elm package install

Some new packages are needed. Here is the upgrade plan.

  Install:
    elm-lang/core 2.1.0

Do you approve of this plan? (y/n) y
Downloading elm-lang/core
Packages configured successfully!
This gives us the necessary manifests and caches that you get with any package managers in Elms case we get,
elm-package.jsonwhich declares all the metadata and dependencies our application needselm-stuff/which acts as our package cache. You'll see the source of the dependencies we downloaded in the previous steps.
Then we want to add the extra dependencies that allow us to quickly build our Elm app,
> mkdir elm-demo-start-app && cd elm-demo-start-app

> elm package install

Some new packages are needed. Here is the upgrade plan.

  Install:
    elm-lang/core 2.1.0

Do you approve of this plan? (y/n) y
Downloading elm-lang/core
Packages configured successfully!

> elm package install evancz/elm-html 3.0.0

To install evancz/elm-html I would like to add the following
dependency to elm-package.json:

    "evancz/elm-html": "3.0.0 <= v < 4.0.0"

May I add that to elm-package.json for you? (y/n) y

Some new packages are needed. Here is the upgrade plan.

  Install:
    evancz/elm-html 3.0.0
    evancz/virtual-dom 1.2.3

Do you approve of this plan? (y/n) y
Downloading evancz/elm-html
Downloading evancz/virtual-dom
Packages configured successfully!

> elm package install evancz/start-app 1.0.0

To install evancz/start-app I would like to add the following
dependency to elm-package.json:

    "evancz/start-app": "1.0.0 <= v < 2.0.0"

May I add that to elm-package.json for you? (y/n) y

Some new packages are needed. Here is the upgrade plan.

  Install:
    evancz/start-app 1.0.1

Do you approve of this plan? (y/n) y
Downloading evancz/start-app
Packages configured successfully!
So far, via the most polite package manager I've ever encountered, we have installed
evancz/elm-htmlwhich allows us to work and build HTML and associated elements attributes, events and CSS stylingevancz/virtual-domis installed as dependency ofelm-htmland provides the virtual DOM implementation that Elm uses.evancz/start-appa small library for making writing standard Elm apps with less upfront wiring.
TO THE CODE!!
The app is going to be really basic, and I really do mean basic. Just enough to demonstrate the core components of the Elm architecture - the model for holding state, the view for visualising app state and the update function for transitioning our state.
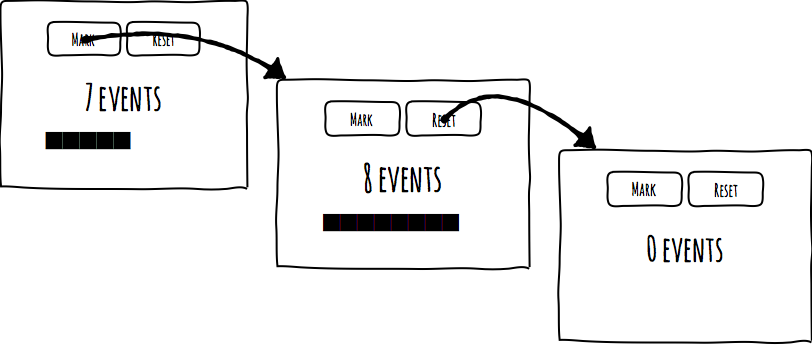
The app will have 2 buttons - "Mark" and "Reset". When you click "Mark" the app will append a block (█) character to represent that event to the event log and increment the number of events logged. When you click "Reset" the app will clear the event log and zero the number of events logged. Contrived? Yes of course. But acceptably so.
Starting Point
So lets create an EventLog.elm file. This will be our one and only code file for the application. We'll start by declaring the module and importing the necessary packages,
module EventLog where

import Html            exposing (..)
import Html.Events     exposing (..)
import Html.Attributes exposing (..)
import Signal          exposing (..)
import StartApp
I've just imported a lot more than we will need for this app but feel free to curate your imports a bit better if you so desire.
Now we will start from the bottom up and declare our main function. This is the starting point for all Elm apps. It will usually return a Signal of some type that can be used by the Elm infrastructure to perform the necessary (re)rendering of your application. You can think of a Signal as a typed stream that emits items as and when they are generated.
As we are using the start-app package ours will look like this,
main : Signal Html
main =
  StartApp.start
    { model = initialModel,
      view = view,
      update = update }
I have included the type signature in here for good measure. Our main simply calls into StartApp.start passing in our 3 main components. Of course we still need to define these so lets go ahead and do this.
Model
Our model will define the entire state of our application. In our case this won't be very big at all, in fact it could literally just be a counter the we increment but for the sake of this experiment we will make it slightly more verbose,
type alias Model =
  { events: List String }

initialModel : Model
initialModel =
  { events = [] }
I defined a type alias because it avoids the mess of having to declare the type as { events: List String } in every type signature that includes it. Then I defined our initialModel using the alias. The initialModel, as the name suggests, is our starting state for our application. An empty model.
View
So now we have our state we can create a visual representation of that state by creating our view,
view : Address Action -> Model -> Html
view address model =
  div []
    [ button [ onClick address (Mark "?") ]
        [ text "Mark" ],
      button [ onClick address Reset ]
        [ text "Reset" ],
      h2 []
        [ text (model.events |> List.length |> toString), text " Events" ],
      div []
        (List.map (\t -> text t) model.events)]
I'd typically break this into smaller functions to keep it a bit cleaner but for explanation purposes this is good enough. Our view takes an address and model. The address is passed in from the work done by start-app and provides a mailbox to send messages our actions to in order to update the model. The model in this case is the current state of the entire application.
With these key bits of data we construct a primitive HTML representation.
- We define buttons that have
onClickhandlers. These handlers simply send actions (we define this type later) to the supplied address. - We define an
h2element that counts the number of events in our event list and displays it - Finally we define a
divthat converts our events list into HTML elements
Actions
Lets go back to this address and actions. As mentioned the start-app package creates an internal mailbox and address that you can send things to which will get passed into our view function. When we send stuff to the address this will ultimately trigger a call to the apps update function. As you can see from the type signature of view the Address is of type Address Action. Action is a type that we will define so lets do that and talk about it after.
type Action = Mark String
            | Reset
If you think back to the UI we had 2 buttons - Mark and Reset. What the Action type does is create a representation of these UI interactions that can be used within our app to signal intent. Types like the Action type - the ones that use | - are called union types. In some ways you can think of them as enums that can accept data as well. By defining this Action type we explicitly declare all the actions that will change the state within our application. No just can but must. That's predictable, thats wonderful and lovely and makes me feel all warm inside.
So, yes sorry I got all excited, the buttons we defined in our view method, each, sends one of these types to the supplied mailbox address. So lets define what happens when we do this,
Update
Right. We have a model, a view and a way to signal changes in state via actions. Now we need to actually manage those state changes. This is where the final piece of the puzzle falls into place,
update : Action -> Model -> Model
update action log =
  case action of
    Mark date ->
      { log | events <- log.events ++ [date] }
    Reset ->
      { log | events <- [] }
The update function is just one big case statement. It gets passed an action and the current state of our application and depending on the action we return a new state for our application. This generation of new state causes our application to be re-rendered and the glorious cycle begin again.
For completeness sake here is the entire EventLog.elm
module EventLog where

import Html            exposing (..)
import Html.Events     exposing (..)
import Html.Attributes exposing (..)
import Signal          exposing (..)
import StartApp

type alias Model =
  { events: List String }

initialModel : Model
initialModel =
  { events = [] }

type Action = Mark String
            | Reset

update : Action -> Model -> Model
update action log =
  case action of
    Mark date ->
      { log | events <- log.events ++ [date] }
    Reset ->
      { log | events <- [] }

view : Address Action -> Model -> Html
view address model =
  div []
    [ button [ onClick address (Mark "?") ] [ text "Mark" ],
      button [ onClick address Reset ] [ text "Reset" ],
      h2 [] [ text (model.events |> List.length |> toString), text " Events" ],
      div [] (List.map (\t -> text t) model.events)
    ]

main : Signal Html
main =
  StartApp.start
    { model = initialModel,
      view = view,
      update = update }
Running the App
Elm comes with some lovely tools to get your first app up and running without having to worry about the usually front end infrastructure such as grunt, gulp, bower, npm and so on and so forth. One of these is reactor
> elm reactor

Elm Reactor 0.3.2 (Elm Platform 0.15.1)
Listening on http://0.0.0.0:8000/
Running elm reactor starts up a little file server (typically on port 8000) and if you navigate to http://localhost:8000 you will see the project files listed. By clicking EventLog.elm reactor will compile your Elm code to JavaScript and inject it into an ephemeral HTML document so you can see and play with our utterly useless creation.
Wrapping Up start-app
So in summary
- The
mainfunction starts our app usingStartApp.startwhich we pass our three main components - The
modelrepresents the current state of our entire application - The
viewprovides a visual representation of our current application state and also generates action signals from user interaction that trigger an update in our application - The
updatefunction takes these actions and creates a new state model for our application which triggers a re-rendering of our view
This is a deceptively simple approach that avoids one of the main pain points in application development - mutable state. Having to manage mutable state introduces a lot of complexity and unpredictability - two things that should never really mix.
Removing start-app
So the next question is "what does start-app do?". As I've demonstrated start-app has provided the glue for realising our application - we just provided the components. Knowing how these things glue together really helps with understanding Elm and its additional features such as signals and ports.
The Mailbox
As we've seen in the previous implementation our view function gets passed an address something that we didn't create ourselves. Internally start-app creates a mailbox - a concept in Elm that provides a typed address that we can send messages to and a signal that emits a value when the address receives a message. So you can see that when we send an action message to the address via the onClick handler in our view we can then trigger a state update.
Without the start-app we need to create the mailbox ourselves,
actions: Mailbox Action
actions =
  mailbox Reset
Our actions mailbox has a type of Action and when we create our mailbox we supply it an example of our Action type (in this case Reset). Often you'll see action types defined with a NoOp and that is often used as an example. Either way he have our mailbox.
Reactive Model
Next up we need to take our initial state and turn it into a reactive model. So that when an action message is received it will cause the update method to alter our state. Now this part is, IMHO, just the cleverest little pattern. The reactive model is just a fold over the signal that is a property of our mailbox starting with our initialState
model: Signal Model
model =
  foldp update initialModel actions.signal
OK technically it's a foldp which is a special signal variant of fold that can yield intermediate results (as an when actions are generated). But thats it. Starting with our initial data when actions occur call the update method - the result of which is yielded by foldp. We have our reactive model.
Mapping Main
Finally we need to replace our main method and wire up all these parts to create our working application.
main : Signal Html
main =
  map (view actions.address) model
Now main becomes a map over the view using our model (the one we made reactive in the last step). As view takes both an address and a model so we create a partially applied or curried function of (view actions.address) that takes the address from our mailbox. So when the model updates the map will cause the view function to be called with the new state which will build our HTML representation and yield a signal value with that HTML representation into the core of Elms rendering engine. Once again the map function (from the Signal package) yields intermediate responses.
And rest...
So that covers the basic architecture of a typical Elm application. You can see how start-app removes some of the extra steps required to wire up an Elm application and would certainly lower the barrier of entry for people new to Elm. That said there are times you want access to the Mailbox (such as when trying to merge in external signals from ports) and start-app hides the mailbox it creates on your behalf.
The underlying principles of Elm are surprisingly simple yet very powerful. They aren't niche concepts either. Fundamentally they are common functional patterns which means, with a modicum of functional thinking, that application design is less made complex as we have to incur less cost in understanding concepts specific to Elm.